Are you tired of looking at a dirty and worn-out fence in your yard? A clean and well-maintained fence not only enhances the look of your property but also protects it from damage. Pressure washing is an effective way to clean and restore fences made of wood, vinyl or metal. However, pressure washing can be tricky if not done correctly. In this ultimate expert guide, we’ll show you how to pressure wash a wood fence like a pro. So grab your power washer and let’s get started!
Can I clean a wood fence with a pressure washer?
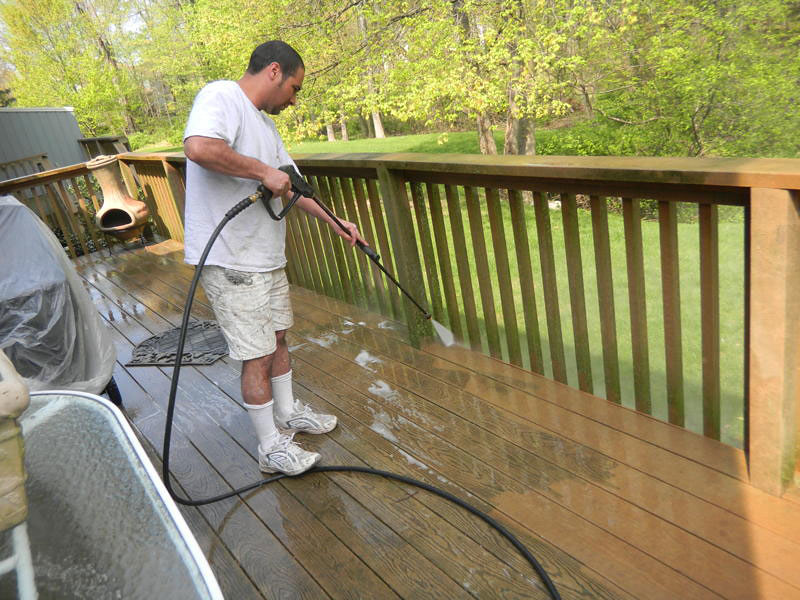
One of the most common questions people ask is whether they can use a pressure washer to clean their wood fence. The answer is yes, but it’s important to do it carefully and correctly. Using too much pressure or holding the nozzle too close to the surface can damage your fence.
Before you start, assess your fence’s condition and determine if there are any loose or damaged boards that need repair. If necessary, make repairs before cleaning your fence with a power washer.
Next, choose an appropriate nozzle for your power washer – one that gives you enough pressure without being too strong. A 25-degree fan tip is ideal for cleaning wooden fences.
It’s also essential to adjust the water pressure on the machine according to how dirty your fence is. Start with low-pressure settings and gradually increase them as needed until you find the right balance between cleaning effectiveness and avoiding damages.
Be sure to wear protective gear like safety goggles and gloves when operating a power washer as high-pressure water streams can potentially harm unprotected skin or eyes if aimed directly at them.
By following these guidelines, you’ll be able to effectively clean your wood fence using a pressure washer without causing any damage!
How to wash With Pressure Washing Soaps?
When it comes to cleaning your wood fence with a pressure washer, using the right soap can make all the difference. Pressure washing soaps are specially formulated to work in conjunction with the high-pressure water stream of your power washer to remove dirt, grime, and other contaminants from your fence.
Before getting started, it’s important to choose a pressure washing soap that is safe for use on your specific type of wood. Some soaps may contain harsh chemicals that can damage or discolor certain types of wood, such as cedar or redwood.
Once you have selected a suitable pressure washing soap, mix it according to the manufacturer’s instructions and apply it evenly over the surface of your fence using a low-pressure nozzle. This will help loosen any dirt or stains before you begin pressure washing.
After allowing the soap to sit for several minutes (as directed by the manufacturer), switch back to a high-pressure nozzle and begin working in sections along with the grain of the wood. Be sure not to linger too long in one spot as this could cause damage or leave marks on your fence.
Rinse off any remaining soap residue thoroughly with clean water before allowing your newly cleaned fence time dry completely. By following these steps carefully when using pressure washing soaps on your wooden fence, you’ll be able to achieve optimal results without causing any unnecessary harm!
Before Getting Started
Before getting started with pressure washing your wood fence, it’s essential to assess the condition of your fence. Check for any loose or damaged boards that may crack under pressure. Repairing those areas before you start will prevent further damage and ensure that water does not seep into the wood.
Next, remove any large debris like leaves and branches from around the perimeter of your fence to avoid clogging up your power washer. You should also close all windows and doors near the area as a precaution against water entering through gaps.
It is important to inspect surrounding plants or landscaping too. Cover any delicate flowers or shrubs with plastic tarps beforehand to protect them from potential chemicals in cleaning solutions used during washing.
Make sure you have all necessary equipment accessible before starting, including a garden hose connected to an outdoor faucet, extension cords if needed for electric power washers, safety goggles and gloves on hand in case splinters fly up while working on rough surfaces like wooden fences. With these precautions taken care of ahead of time, you can start pressure washing without worrying about unexpected problems occurring!
Steps to Clean Your Fence with a Power Washer
When it comes to cleaning your wood fence with a power washer, there are specific steps that you need to follow. This will ensure that you don’t damage the material and get an effective clean.
Firstly, make sure to remove any debris or loose dirt on your fence using a broom or brush. This will prevent any scratches from occurring during the pressure washing process.
Next, attach the appropriate nozzle for your fence’s surface and adjust the pressure accordingly. It is essential to start at low pressure settings while increasing gradually as needed.
Begin by spraying water in sections of about 6 feet wide at a time. Hold the wand about 2 feet from the surface and move it back and forth slowly until all grime has been removed.
If necessary, use pressure washing soap recommended for fences, apply directly onto each section before rinsing off thoroughly.
Allow enough time for your fence to dry fully before applying paint or sealant if needed.
By following these simple steps carefully when using a power washer on your wood fence, you can effectively clean without damaging it while achieving excellent results!
What is the difference between power and pressure washing?
When it comes to cleaning your fence, there are two main options: power washing and pressure washing. While these terms are often used interchangeably, they actually refer to slightly different methods of cleaning.
Power washing uses hot water and high pressure to blast away dirt and grime from surfaces. This method is more effective at removing stubborn stains than traditional pressure washing, which uses cold water and high pressure.
On the other hand, pressure washing is better for delicate surfaces like wood fences since it doesn’t use heated water that could damage the surface. Pressure washers can adjust their psi (pounds per square inch) settings depending on the type of surface being cleaned.
Ultimately, the decision between power or pressure washing will depend on several factors including the condition of your fence and what kind of stains you need to remove. It’s always a good idea to consult with a professional before deciding which method is right for you.
Safety considerations -Step by Step
In order to effectively pressure wash your wood fence, it’s important to always prioritize safety. Pressure washing can be dangerous if not done properly, so make sure you follow these safety steps:
1. Wear protective gear including goggles, gloves and closed-toe shoes:- Protective gear is essential when pressure washing a wood fence. Goggles will protect your eyes from flying debris, while gloves and shoes will protect your hands and feet from being burned by hot water or cut by sharp objects.
2. Get familiar with the equipment:- Before starting the pressure washing process, it’s important to get familiar with the equipment. Make sure you know how to operate all of the components, and that you understand the instructions provided by the manufacturer.
3. Check for any damage:- Before beginning, examine the entire fence and look for any cracks, splinters or other signs of damage. If you notice anything suspicious, stop immediately and contact a professional to have it repaired before continuing.
4. Start with low pressure:- Begin pressure washing at a low setting initially to make sure you don’t cause any unnecessary damage to the wood fence or yourself. You can always increase the pressure if needed once you get comfortable with using the pressure washer.
5. Move in one direction:- Always move in one direction when pressure washing your fence in order to avoid streaks or unevenness in your cleaning job. Moving up and down or side-to-side can leave unsightly marks
By following these simple steps and taking appropriate precautions, you can safely clean your wood fence with confidence.
Now that you know how to pressure wash a wood fence like an expert, it’s time to get started! With just a little bit of effort and some good old-fashioned elbow grease (and maybe some soap), you can have your fence looking as good as new in no time!
Is it OK to pressure wash a wood fence?
Pressure washing is a great way to clean your wood fence, but it can also cause damage if not done correctly. So, is it OK to pressure wash a wood fence? The answer is yes, as long as you use the right techniques and equipment.
Firstly, you need to make sure that the PSI of your pressure washer isn’t too high. A PSI between 500-800 should be sufficient for most wooden fences. Anything higher than that may cause damage or splintering.
Secondly, always use a wide angle tip when cleaning the fence to minimize any potential harm. This will help distribute the water evenly and prevent any concentrated streams from damaging the wood fiber.
Avoid using hot water as it can remove any natural oils or finishes on your fence that protect against weathering and rotting.
Pressure washing is an effective method for maintaining and preserving your wooden fence – just remember to take all necessary precautions before doing so!
What PSI is needed to power wash a fence?
When it comes to power washing a wood fence, the PSI (pounds per square inch) of your pressure washer is an essential consideration. Using too much pressure can damage the wood and leave unsightly marks on your fence. On the other hand, not enough pressure won’t effectively remove dirt and grime.
The ideal PSI for cleaning a wood fence is between 500-600. This level of pressure is strong enough to remove dirt buildup and stains without harming the wood’s surface or texture. In contrast, using a higher-pressure setting can cause splintering or etching in the wooden surface.
It’s also important to choose the right nozzle when cleaning a wooden fence with a power washer. A fan tip nozzle creates a wide spray pattern that will help prevent any damage from high-pressure streams while still providing adequate cleaning force.
In summary, choosing the correct PSI for power washing your wood fence will depend on several factors such as age, condition, and type of wood used in construction. Always test out different settings and nozzles in an inconspicuous area before starting full-scale work on your entire fencing project to avoid any permanent damages!
How do you clean a weathered wood fence?
Cleaning a weathered wood fence can be challenging, but it’s important to get it done before staining or painting. The first step is to remove any loose dirt and debris using a stiff brush. Be sure to wear gloves and protective eyewear during this process.
Next, mix a cleaning solution of one part bleach and two parts water in a bucket. Apply the solution onto the fence using a sprayer or spray bottle. Allow the solution to sit on the fence for about 15-20 minutes, depending on how dirty it is.
After letting the solution soak, use a pressure washer (set at no more than 1500 PSI) with low-pressure nozzle to rinse off the cleaning solution along with any remaining dirt or grime from your wooden fence.
If you don’t have access to a pressure washer, consider renting one from your local home improvement store or hire professional help for best results.
Let your wood fence dry completely before proceeding with any further treatments like staining or painting. This will ensure that the surface is ready for application and will improve adhesion of whatever product you choose.
Can I just pressure wash my fence before staining?
Pressure washing your fence before staining is a great idea because it helps remove dirt, grime and other debris that can prevent the stain from properly adhering to the wood. However, just pressure washing alone may not be enough to prepare your fence for staining.
Before you begin pressure washing, make sure to inspect your fence for any damaged or rotten areas. If you find any issues, repair them first before proceeding with cleaning.
When using a pressure washer on your wood fence, it’s important to use the correct nozzle and setting to avoid damaging the wood. A fan tip nozzle with a PSI of 1,500-2,000 should be sufficient for most fences.
After pressure washing your fence thoroughly and allowing it time to dry completely (at least 24 hours), consider using a wood brightener solution to restore its natural color prior to applying stain. This will help ensure an even coat of stain and longer-lasting protection.
Remember that preparation is key when it comes to staining your fence. While pressure washing is an important step in preparing your fence for staining, take care not to skip other necessary steps such as repairing damaged areas and using a wood brightener solution if needed.
Is it better to spray or roll stain on a fence?
When it comes to staining a fence, there are two common methods: spraying and rolling. Both have their pros and cons, so it ultimately depends on your personal preference.
Spraying can be quicker than rolling as it covers more surface area in less time. It also allows for a more even coat of stain. However, overspray can be an issue if you’re not careful with the application process. You’ll need to cover any nearby surfaces that you don’t want stained before beginning.
Rolling may take longer than spraying but is generally easier to control and produces less mess. It’s also better suited for smaller fences or hard-to-reach areas that might be missed by a sprayer. Rolling can result in thicker coats of stain though, which may require additional drying time.
In summary, both methods work well for staining a wood fence; it just depends on your specific needs and preferences. Consider factors like size of the fence, amount of time available for the project and desired finish look when deciding between spray or roll methods
How long to let fence dry after pressure washing before staining?
After pressure washing your wood fence, it’s crucial to let it dry completely before staining. The amount of time needed for the fence to dry will depend on various factors such as the weather, type of wood and how much water was used during the cleaning process.
Typically, you should wait at least 48 hours after pressure washing before applying any stain or sealant. However, if the weather is damp or humid, you may need to give it more time.
To speed up the drying process, make sure there is proper airflow around your fence. If possible, remove any nearby objects that could block air from circulating freely.
It’s important not to rush this step in order to ensure a successful staining job. Attempting to stain a wet or damp fence can lead to uneven coloring and poor absorption of the stain.
In summary, always allow sufficient time for your wooden fence to dry thoroughly after being pressure washed before applying any stains or sealants. Be patient and let nature do its work so that you can enjoy a beautiful looking wood fence that lasts longer.
What happens if you don’t clean fence before staining?
Ignoring the cleaning process before staining your fence can cause serious problems. The stain won’t adhere effectively, leaving it unevenly covered or with patchy spots. This will make your fence look unattractive and old.
Additionally, dirt and debris present in the wood may prevent stain penetration, leading to an inconsistent finish that wears off quickly.
Furthermore, stains aren’t just meant to enhance the aesthetic appeal of your fence; they also protect it against harmful elements such as moisture, UV rays from the sun, insects and rotting. If you fail to clean your fence before applying a protective layer of stain on top of accumulated dirt and residue, these damaging factors will continue eating away at your wood.
In essence, neglecting proper cleaning techniques is a recipe for disaster when it comes to maintaining a healthy-looking wooden fence that lasts longer than expected. It’s always better to take time out for thorough cleaning before staining than having regrets later on!
What is the best chemical to clean a wood fence?
Selecting the Best Chemical to Clean a Wood Fence
A clean and well-maintained wood fence not only enhances your property’s curb appeal but also extends its lifespan. While pressure washing can be an effective way to deep-clean your wooden fence, using the right chemical cleaner is crucial in achieving optimal results.
There are several commercially available cleaners designed specifically for cleaning wood fences. Some of these include:
1. Oxalic acid-based cleaners: These cleaners help remove tough stains and discolorations caused by mold, mildew, or rust without damaging the surface of your wood.
2. Sodium percarbonate-based cleaners: Commonly known as oxygen bleach, it is an eco-friendly option that effectively cleans dirt and grime while brightening the appearance of weathered wood.
3. Alkaline-based cleaners: Also called deck brighteners or revitalizers, they work best for removing tannin stains from cedar or redwood fences.
4. Mild detergent solutions: A diluted mixture of water and dish soap can be used for general cleaning purposes on slightly dirty fences.
Before choosing any chemical solution mentioned above, always remember to read and follow the manufacturer’s instructions carefully to ensure safe use on your specific type of wood fence material – some chemicals may not be appropriate for certain types of woods.
In addition to selecting the right cleaner, proper rinsing with fresh water after applying any cleaning agent will ensure no residue remains on your fence before staining or sealing it up again – allowing you to enjoy a beautiful-looking wooden barrier around your property!