Properly configuring the pressure regulator or unloader valve on a pressure washer involves several steps. In this guide, we will outline the correct procedure for a few common unloader valves. But before delving into the step-by-step process, let’s first understand the fundamental concept.
Each pressure washer’s unloader valve has an optimal spring tension. This tension ensures that, when you engage the pressure washer trigger gun, you achieve maximum pressure. Additionally, it minimizes the abrupt increase in pressure when you release the trigger gun.
Your objective is to pinpoint this ideal tension setting. Some pressure regulators even allow you to adjust the pressure below the maximum level for tasks such as car washing, screen cleaning, or wood treatment. Importantly, they enable you to seamlessly revert to the maximum setting without crossing the threshold where releasing the trigger could lead to a hazardous pressure surge.
Step 1:
Ensure that the engine or motor is operating at the correct RPM, which should be 3700 RPM without a load or 3400 RPM when operating under a load.
Step 2:
Utilize a new high-power washer spray nozzle with the appropriate size orifice specifically designed for your pressure washer.
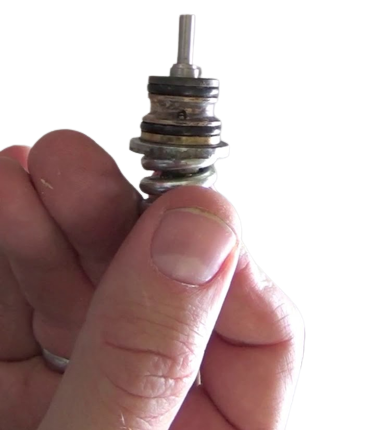
Step 3:
Begin by removing the nylock nut located at the top of the unloader valve. Proceed to unscrew the black plastic pressure adjustment knob, taking care to also remove the thin washer and the spring. This will reveal a threaded piston rod featuring two locking nuts.
Step 4:
Securely fasten the two nuts together using wrenches, positioning them three threads from the bottom. Then, reattach the spring washer and the black adjusting knob.

Attach a pressure gauge assembly between the pump and the high-pressure hose in a way that allows you to monitor it while activating the gun and adjusting the knob.
Before starting the machine, turn on the water supply. Trigger the gun until all air is expelled from the pump, and only water is flowing.
With your gaze on the pressure gauge, trigger the gun and begin tightening the spring by adjusting the knob. If the nuts have been set slightly too low, as you tighten the spring, you will eventually achieve maximum pressure when the gun is engaged. Upon releasing the gun trigger, the pressure will only exhibit a slight increase of around 6 to 9%. This precise point is where you want the nuts to halt the adjustment knob.
It’s important to note that excessive tightening of the spring beyond this point won’t result in additional operational pressure when the trigger is pulled. Instead, it leads to a hazardous high spike in pressure when the trigger is released, which could potentially damage the pump.
It’s crucial to maintain the pressure spike upon trigger release within a 10% range. For instance, if you are setting the working pressure to 3500 PSI, the pressure should not exceed 3850 PSI when the trigger is released.
Step 5:
In order to facilitate the initial conditioning of the unloader valve, proceed to activate the gun trigger and release it approximately 20 times. This practice helps prevent the unloader valve from sticking or becoming non-responsive.
Step 6:
While the pressure washer is operational, continue by removing the adjusting knob, washer, and spring. Adjust the position of the two nuts along the piston rod—either higher or lower—until you discover the precise point where fully threading the adjusting knob onto the two nuts yields maximum pressure when the gun is engaged and a minimal pressure spike upon releasing the trigger.
Once this optimal position is identified, remove the adjusting knob, washer, and spring, and firmly tighten the two nuts together using wrenches. Subsequently, reattach the spring, washer, and adjusting knob.
Gradually turn the spring until it reaches the limit against the two nuts. Reassess both the pressure and the spike pressure. If these measurements remain satisfactory, affix the nylock nut onto the top of the piston rod, ensuring the rod slightly protrudes through the nylon.
Finally, place the cap on top of the adjusting knob.
With this setup, you can now adjust the pressure while the gun is engaged by rotating the adjusting knob positioned between the two nuts and the nylock on top.
It’s crucial to avoid adjusting the unloader when the gun is not engaged, as doing so can lead to forceful movements of the internal components within the unloader, potentially causing damage.
Faq
FAQ 1: Why is Proper Pressure Regulator Adjustment Important?
Answer: Proper adjustment of the pressure regulator ensures that your pressure washer functions optimally, delivering the right amount of pressure for various tasks. This adjustment helps prevent excessive pressure spikes and potential damage to the equipment.
FAQ 2: How Does Spring Tension Impact Pressure Washer Performance?
Answer: Spring tension in the unloader valve determines the pressure levels generated when the pressure washer trigger gun is engaged. The correct tension maximizes pressure output while minimizing abrupt pressure spikes upon releasing the trigger.
FAQ 3: Can Pressure Regulators be Adjusted for Different Tasks?
Answer: Yes, many pressure regulators allow you to adjust pressure levels below the maximum setting. This flexibility is useful for safely performing tasks like car washing, screen cleaning, or wood treatment. You can then easily return to the maximum pressure setting without risking hazardous pressure surges.
FAQ 4: What’s the Significance of Avoiding Hazardous Pressure Spikes?
Answer: Preventing hazardous pressure spikes is crucial as they can damage the pressure washer, its components, or even cause harm. Maintaining pressure within a safe range minimizes the risk of accidents, equipment failure, and ensures a longer lifespan for your pressure washer.
In conclusion,
properly setting the pressure regulator or unloader valve is vital for optimizing your pressure washer’s performance and safety. Understanding the significance of spring tension and its impact on pressure output and release spikes is key. Adjusting pressure for specific tasks and avoiding dangerous spikes are essential practices to ensure efficient and damage-free operation. By following these steps and guidelines, you can achieve the ideal pressure configuration and enjoy effective, safe, and reliable pressure washing experiences.